using System;
using System.Data;
using System.Data.SqlClient;
using System.Configuration;
using System.Web.UI.WebControls;
using System.Web.UI;
public partial class ListControlsDemo : System.Web.UI.Page
{
SqlConnection conn;
SqlDataAdapter adapter;
DataSet ds;
SqlCommand cmd;
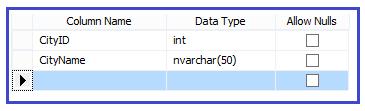
string cs = ConfigurationManager.ConnectionStrings["conString"].ConnectionString;
protected void Page_Load(object sender, EventArgs e)
{
if (!IsPostBack)
{
PopulateList();
}
}
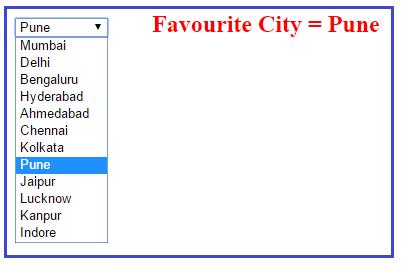
protected void PopulateList()
{
try
{
conn = new SqlConnection(cs);
adapter = new SqlDataAdapter("select * from tblCity", conn);
ds = new DataSet();
adapter.Fill(ds);
DropDownList1.DataSource = ds;
DropDownList1.DataTextField = "CityName";
DropDownList1.DataBind();
}
catch (Exception ex)
{
Label1.Text = "ERROR :: " + ex.Message;
}
}
protected void DropDownList1_SelectedIndexChanged(object sender, EventArgs e)
{
string SelectedItem = DropDownList1.SelectedItem.Text;
Label1.Text = "Favourite City = "+SelectedItem;
}
}
protected void PopulateList()
{
cmd = new SqlCommand("select * from tblCity", conn);
conn.Open();
SqlDataReader reader = cmd.ExecuteReader();
DropDownList1.DataSource = reader;
DropDownList1.DataTextField = "CityName";
DropDownList1.DataBind();
conn.Close();
}
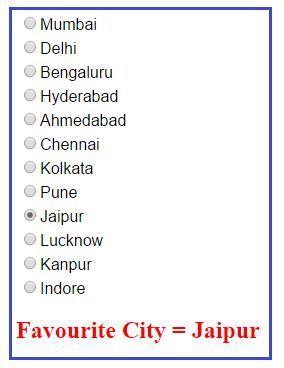
protected void PopulateList()
{
try
{
conn = new SqlConnection(cs);
adapter = new SqlDataAdapter("select * from tblCity", conn);
ds = new DataSet();
adapter.Fill(ds);
RadioButtonList1.DataSource = ds;
RadioButtonList1.DataTextField = "CityName";
RadioButtonList1.DataBind();
}
catch (Exception ex)
{
Label1.Text = "ERROR :: " + ex.Message;
}
}
protected void RadioButtonList1_SelectedIndexChanged(object sender, EventArgs e)
{
string SelectedItem = RadioButtonList1.SelectedItem.Text;
Label2.Text = "Favourite City = " + SelectedItem;
}
protected void PopulateList()
{
try
{
conn = new SqlConnection(cs);
adapter = new SqlDataAdapter("select * from tblCity", conn);
ds = new DataSet();
adapter.Fill(ds);
ListBox1.DataSource = ds;
ListBox1.DataTextField = "CityName";
ListBox1.DataBind();
}
catch (Exception ex)
{
Label1.Text = "ERROR :: " + ex.Message;
}
}
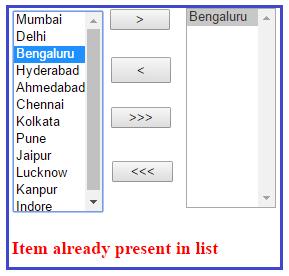
protected void Button1_Click(object sender, EventArgs e)
{
foreach (ListItem item in ListBox1.Items)
{
if (item.Selected)
{
if (ListBox2.Items.Contains(item))
{
Label1.Text = "Item already present in second list";
}
else
{
ListBox2.Items.Add(item);
}
}
}
}
protected void Button2_Click(object sender, EventArgs e)
{
foreach (ListItem item in ListBox2.Items)
{
if (item.Selected)
{
if (ListBox1.Items.Contains(item))
{
Label1.Text = "Item already present in first list";
}
else
{
ListBox1.Items.Add(item);
}
}
}
}
protected void Button3_Click(object sender, EventArgs e)
{
while (ListBox1.Items.Count > 0)
{
for (int i = 0; i < ListBox1.Items.Count; i++)
{
ListBox2.Items.Add(ListBox1.Items[i]);
ListBox1.Items.Remove(ListBox1.Items[i].Text);
}
}
}
protected void Button4_Click(object sender, EventArgs e)
{
while (ListBox2.Items.Count > 0)
{
for (int i = 0; i < ListBox2.Items.Count; i++)
{
ListBox1.Items.Add(ListBox2.Items[i]);
ListBox2.Items.Remove(ListBox2.Items[i].Text);
}
}
}
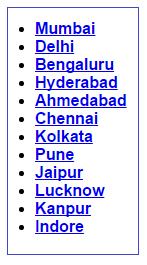
protected void PopulateList()
{
try
{
conn = new SqlConnection(cs);
adapter = new SqlDataAdapter("select * from tblCity", conn);
ds = new DataSet();
adapter.Fill(ds);
BulletedList1.DataSource = ds;
BulletedList1.DataTextField = "CityName";
BulletedList1.DataBind();
}
catch (Exception ex)
{
Label1.Text = "ERROR :: " + ex.Message;
}
}