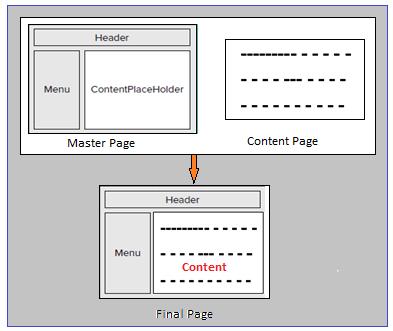
Master pages in ASP.NET work as a template page. All aspx pages can refer master pages. With the help of Master pages we can define the look and feel of all the pages in our web site in a single location. If we have done changes in master page, then the changes will reflect in all the web pages that refer to master pages.
ASP.NET web page that uses master page for common UI, is called as content page. Content pages merge with the master pages at compile time to produce final output. The final page combines the layout of the master page with the content from the content page.
Before
Master pages feature in ASP.NET, developers created consistent web pages by using custom controls, CSS and JavaScript. Now developing consistent web pages are very easy with the help of Master pages. You can dynamically change the common UI part on master page from content pages.
A master page has the extension .master that can comprise static text, HTML elements, and server controls. A master page is similar to an ASP.NET page but it contains @Master directive at the top and one or more ContentPlaceHolder server controls.
Master page inherits from the MasterPage class.
ContentPlaceHolder is an important control that is related with master page.
ContentPlaceHolder control is available only on master page. You can use more than one ContentPlaceHolder control in master page. ContentPlaceHolder control is used on master page to customize or add some controls on the content page as follows:
<asp:ContentPlaceHolder ID="ContentPlaceHolder1" runat="server">
</asp:ContentPlaceHolder>
The page-specific content is then put inside a Content control that points to the relevant ContentPlaceHolder:
<asp:Content ID="Content2" ContentPlaceHolderID="ContentPlaceHolder1" Runat="Server">
<asp:Button ID="Button1" runat="server" Text="Button" />
</asp:Content>
In the above example a Button control is placed inside Content control.
Note that the ContentPlaceHolderID attribute of the Content control points to the ContentPlaceHolder1 that is defined in the master page.
Open your visual studio, create a new website and add the master page. You will see the code as given below.
<%@ Master Language="C#" AutoEventWireup="true" CodeFile="MasterPage.master.cs" Inherits="MasterPage" %>
<!DOCTYPE html>
<html xmlns="http://www.w3.org/1999/xhtml">
<head runat="server">
<title></title>
<asp:ContentPlaceHolder id="head" runat="server">
</asp:ContentPlaceHolder>
</head>
<body>
<form id="form1" runat="server">
<div>
<asp:ContentPlaceHolder id="ContentPlaceHolder1" runat="server">
</asp:ContentPlaceHolder>
</div>
</form>
</body>
</html>
Referencing Master Page Properties and Controls from Content Pages
You can access the Properties and Controls of Master Pages from content pages. In many situations you need User’s Name and EmailID in different content pages. You can set this value inside the master page and then make it available to content pages as a property of the master page.
We will follow the following steps to reference the properties of master page from content pages.
Following is the process to reference master page properties from a content page:
1. Create a property in the master page code-behind file.
2. Add the @ MasterType directive to the .aspx content page and set the virtual path.
3. Use Master<PropertyName> syntax to refer master page property from the content page.
Step 1: Create a property in the master page code-behind file.
public String UserName
{
get
{
return (String)Session["Name"];
}
set
{
Session["Name"] = value;
}
}
public String UserEmailID
{
get
{
return (String)Session["EmailID"];
}
set
{
Session["EmailID"] = value;
}
}
Add the @ MasterType declaration to the .aspx content page to reference master properties in a content page. This declaration is added just below the @ Page declaration as follows:
<%@ Page Title="" Language="C#" MasterPageFile="∼/MasterPage.master" AutoEventWireup="true" CodeFile="Default2.aspx.cs" Inherits="Default2" %>
<%@ MasterType VirtualPath="∼/MasterPage.master" %>
Once you add the @ MasterType declaration, you can reference properties as follows.
string Name = Master.UserName;
string emailID = Master.UserEmailID;
For referencing controls in the Master Page we will write the following code.
Content Page Code.
For accessing controls, those are located at master page, from content page, use Master.FindControl method.
protected void Button1_Click(object sender, EventArgs e)
{
TextBox txtName = (TextBox)Master.FindControl("TextBox1");
Label1.Text = txtName.Text;
}
Themes in ASP.NET
Themes enables you to set the property of controls, define the colors, size, and appearance of your site at a centralize place. By using Themes you can provide a consistent appearance to your web site.
Normally we set property of each controls in every page. For example, setting the background color, font size, border style, and other styles of controls. It is easy but time consuming process and difficult to change on every page. Instead, you can use ASP.NET themes. It will save development time and provide consistent look of controls.
ASP.NET themes consists the following items:
- Skins
- Cascading Style Sheets (CSS)
- Images and other resources
Creating a Theme
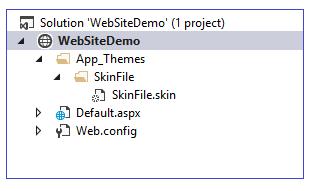
ASP.NET provides a special folder for themes called as
App_Theme folder. Again this folder contains separate folders for each theme in your site. Default name of this inner folder is SkinFile. You can add the respective skins and style sheets into this folder.
In Visual Studio, right-click your web site in the Solution Explorer, select add new item and then select Skin file option. Click OK button. It will ask, do you want to place the file in App_Theme folder? If you click YES, then it will automatically create the App_Theme folder.
In this folder, a skin folder is created, and newly created skin file is placed in this skin folder.
We can also directly create the App_Theme folder as:
- In Visual Studio, right-click your Web site in the Solution Explorer.
- Select Add ASP.NET Folder.
- Select Theme.
It will create App_Theme and sub folder. Now you can provide the skin file name in sub folder according to application need. For example RedTheme, BlueTheme or TextBoxTheme.
You can apply theme at
- Controls Level
- Page Level
- Entire Web application
- Global theme for all web sites.
Adding Skins to Themes
Suppose that your requirement in an application is that every TextBox should appear with a light green background color and a dotted border.
SkinFile \ TextBox.skin
<asp:TextBox
BackColor="LightGreen"
BorderStyle="Dotted"
Runat="Server" />
Here skin file name is TextBox.skin. There is no restriction to provide the name of skin file, but we should provide the name according to control, so it can be easily distinguishes to other skin file. We can create more than one skin file in a skin folder.
Now attach this skin file at the page directive as given below.
<%@ Page Language="C#" AutoEventWireup="true" CodeFile="Default.aspx.cs" Inherits="_Default" Theme="SkinFile"%>
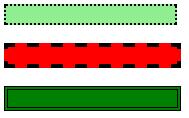
There are three textbox controls in Default.aspx page. Because we have applied the skin file at page level, therefore when we run our application all textbox will appear as given below.
 Creating Named Skins
This skin is called as default skin because it is applied to all control of certain type. For example, the above Skin is applied to every instance of a TextBox control. Note that we have not provided any ID to skin but runat="server" is compulsory.
You can also create named skin by providing the SkinID attribute. The SkinID property represents the name of the Named Skin. If you have created a Named Skin, then you can decide in which particular control, you want to apply the Skin.
The Default Skin does not contain a SkinID property. In the given example, the first textbox is not associated with a Named Skin, therefore the Default Skin is applied to the first TextBox on default.aspx page. Set the skinID property of second and third textbox programmatically or from property window.
<asp:TextBox
BackColor="LightGreen"
BorderStyle="Dotted"
Runat="Server" />
<asp:TextBox
SkinID="RedTextBox"
BorderStyle="Dashed"
BackColor="Red"
BorderWidth="4px"
Runat="Server" />
<asp:TextBox
SkinID="GreenTextBox"
BackColor="Green"
BorderStyle="Double"
BorderWidth="4px"
Runat="Server" />
Execute the application you will get the following output.
Server control has the property EnableTheming. By default its value is true. If you want that theme should not apply with particular control, then set EnableTheming=false.
Adding Cascading Style Sheets to Themes
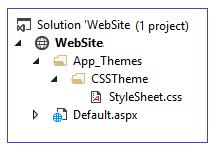
You can also use Cascading Style Sheets into the Theme folder. It is used to manage the appearance of HTML and ASP.NET controls contained in a page. Adding a Cascading Style Sheet to Theme is same as we add skin file. Right-click on the theme in Solution Explorer and select Add New Item and then select the Style Sheet item template. Provide the name of Theme according the need. I have provided the name CSSTheme.
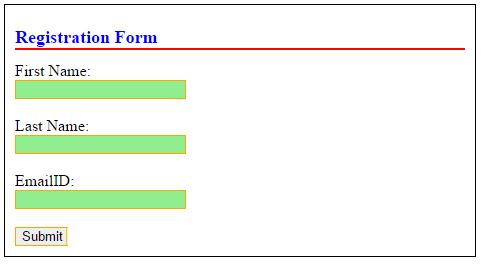
 The following is the simple style in a style sheet:
StyleSheet.css file
.content {
width: 450px;
border: solid 1px black;
background-color: White;
padding: 10px;
}
h1 {
color: blue;
font-size: 18px;
border-bottom: solid 2px red;
}
label {
font-weight: bold;
}
input {
background-color: lightgreen;
border: solid 1px orange;
}
.button {
background-color: #eeeeee;
}
<%@ Page Language="C#" AutoEventWireup="true" CodeFile="Default.aspx.cs" Inherits="Default" Theme="CSSTheme" %>
<!DOCTYPE html>
<html xmlns="http://www.w3.org/1999/xhtml">
<head id="Head1" runat="server">
<title>CSS in Theme</title>
</head>
<body>
<form id="form1" runat="server">
<div class="content">
<h1>Registration Form</h1>
<asp:Label
ID="lblFirstName"
Text="First Name:"
runat="server" />
<br />
<asp:TextBox
ID="txtFirstName"
runat="server" />
<br />
<br />
<asp:Label
ID="lblLastName"
Text="Last Name:"
runat="server" />
<br />
<asp:TextBox
ID="txtLastName"
runat="server" />
<br />
<br />
<asp:Label
ID="lblEmail"
Text="EmailID:"
runat="server" />
<br />
<asp:TextBox
ID="EmailID"
runat="server" />
<br />
<br />
<asp:Button
ID="btnSubmit"
Text="Submit"
CssClass="button"
runat="server" />
</div>
</form>
</body>
</html>
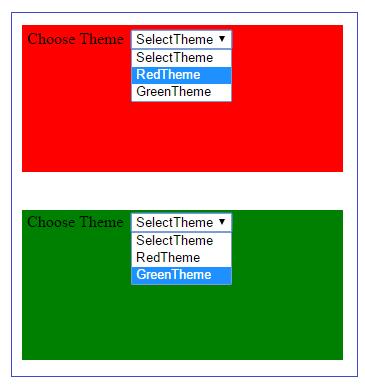
Applying Themes Dynamically
You can also use Themes dynamically. At runtime you customize the look and feel of your website by selecting different Themes.
Page_PreInit event is used to set the Themes at runtime. In the given example, user can select red or green theme option from dropdownlist.
RedStyleSheet.css
Html
{
background-color : red;
}
GreenStyleSheet.css
html
{
background-color : green;
}
using System;
using System.Web.UI;
public partial class Default : System.Web.UI.Page
{
protected void Page_Load(object sender, EventArgs e)
{
}
protected void Page_PreInit(object sender, EventArgs e)
{
string theme=Request.QueryString["MyTheme"];
if(theme!=null)
{
Page.Theme = theme;
}
}
protected void DropDownList1_SelectedIndexChanged(object sender, EventArgs e)
{
string name = DropDownList1.SelectedItem.Text;
Response.Redirect("Default.aspx?MyTheme="+name);
}
}