There are some conventions in ASP.NET MVC that needs to be followed. For example, if you are creating controllers, then its name must have the word controller and should implement IController interface either directly or indirectly. Views should be placed in a specific location that MVC can find them.
By default controller and action method name written in RouteConfig.cs file, that is located in App_Start folder of your application.
routes.MapRoute(
name: "Default",
url: "{controller}/{action}/{id}",
defaults: new { controller = "Home", action = "Index", id = UrlParameter.Optional }
If your controller name is other than Home, then you should change it in the RouteConfig.cs file or explicitly provide the name of controller at the address bar of your browser.
In MVC, there is no strict rule for model. Basically models are class file. So we can create these files anywhere and after creating and building, we can refer these files. They can even be present in a separate project.
Create an ASP.NET MVC Web application and provide the name according to your requirement. We have given the name as MVCBusinessObject.
Add a Class Library project with Name "DataLayer"
Right click on solution ‘MVCBusinessObject’. Add → New Project. Select class library and give the name, click OK. Change the class name as Employee and update the class.
using System;
using System.Collections.Generic;
using System.Linq;
using System.Text;
namespace DataLayer
{
public class Employee
{
public int EmpID { get; set; }
public string Name { get; set; }
public string Gender { get; set; }
public string Address { get; set; }
public double Salary { get; set; }
}
}
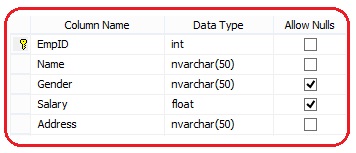
tblEmps in SQL Server
Add another class file in DataLayer library. Update the class name as ‘EmployeeBusinessLayer’. This class contains the business logic code and retrieves the data from the database. Please keep in mind that System.Configuration namespace is not available by default. You have to explicitly add this assembly. Therefore, before writing the code for retrieving the data from the database, first add reference to this library. Go to the references folder of this library project then right-click on the References folder and select .Net then select "System.Configuration" assembly.
using System;
using System.Collections.Generic;
using System.Linq;
using System.Text;
using System.Configuration;
using System.Data;
using System.Data.SqlClient;
namespace DataLayer
{
public class EmployeeBusinessLayer
{
public IEnumerable<Employee> employees
{
get
{
string conString = ConfigurationManager.ConnectionStrings["EmpContext"].ConnectionString;
List<Employee> empList = new List<Employee>();
using (SqlConnection con = new SqlConnection(conString))
{
SqlCommand cmd = new SqlCommand("select * from tblemps", con);
con.Open();
SqlDataReader dr = cmd.ExecuteReader();
while (dr.Read())
{
Employee empObj = new Employee();
//Initialization of Employee cbject
empObj.EmpID = Convert.ToInt32(dr["EmpId"]);
empObj.Name = dr["Name"].ToString();
empObj.Gender = dr["Gender"].ToString();
empObj.Salary = Convert.ToDouble(dr["Salary"]);
empObj.Address = dr["Address"].ToString();
empList.Add(empObj);
}
}
return empList;
}
}
}
}
Write your connection string in the web config file as given below. The name of the connection string is EmpContext.
<connectionStrings>
<add name="EmpContext" connectionString ="Integrated Security=true;Initial Catalog=Employee;Data Source=.;" providerName="System.Data.SqlClient"/>
</connectionStrings>
Now build your application.
Right click on the "References" folder of the "MVCBusinessObject" project, and add a reference to "DataLayer" project.
using System;
using System.Collections.Generic;
using System.Linq;
using System.Web;
using System.Web.Mvc;
using DataLayer;
namespace MvcBusinessObject.Controllers
{
public class EmployeeController : Controller
{
public ActionResult Index()
{
EmployeeBusinessLayer empBusLayer = new EmployeeBusinessLayer();
List<Employee> empList= empBusLayer.employees.ToList();
return View(empList);
}
}
}
Right click on the Index() action method in the "EmployeeController" class and select "Add View" from the context menu. A window will open. In that window set thefollowing attribute.
View name = Index
View engine = Razor
Select "Create a strongly-typed view" checkbox
Scaffold Template = List
Click "Add" button.
@model IEnumerable<DataLayer.Employee>
@{
ViewBag.Title = "Index";
}
<h2>Employee Details</h2>
<p>
@Html.ActionLink("Create New", "Create")
</p>
<style>
table, th, td
{
border: 1px solid grey;
border-collapse: collapse;
padding: 5px;
}
table tr:nth-child(odd)
{
background-color: #ffe6e6;
}
table tr:nth-child(even)
{
background-color: #ccffcc;
}
</style>
<table style="font-family:Arial; font-size:medium; color:darkblue">
<tr>
<th>
@Html.DisplayNameFor(model => model.EmpID)
</th>
<th>
@Html.DisplayNameFor(model => model.Name)
</th>
<th>
@Html.DisplayNameFor(model => model.Gender)
</th>
<th>
@Html.DisplayNameFor(model => model.Address)
</th>
<th>
@Html.DisplayNameFor(model => model.Salary)
</th>
<th></th>
</tr>
@foreach (var item in Model)
{
<tr>
<td>
@Html.DisplayFor(modelItem => item.EmpID)
</td>
<td>
@Html.DisplayFor(modelItem => item.Name)
</td>
<td>
@Html.DisplayFor(modelItem => item.Gender)
</td>
<td>
@Html.DisplayFor(modelItem => item.Address)
</td>
<td>
@Html.DisplayFor(modelItem => item.Salary)
</td>
<td>
@Html.ActionLink("Edit", "Edit", new { /* id=item.PrimaryKey */ })|
@Html.ActionLink("Details", "Details", new { /* id=item.PrimaryKey */ })|
@Html.ActionLink("Delete", "Delete", new { /* id=item.PrimaryKey */ })
</td>
</tr>
}
</table>
Please note that when we understand the Edit, Update, delete in MVC, then in above action link (Edit, Delete) code, remove the comment and provide the primary key of your table otherwise it will give error.
Before running this application, change the controller name in the Route.config file.
routes.MapRoute(
name: "Default",
url: "{controller}/{action}/{id}",
defaults: new { controller = "Employee", action = "Index", id = UrlParameter.Optional }
);
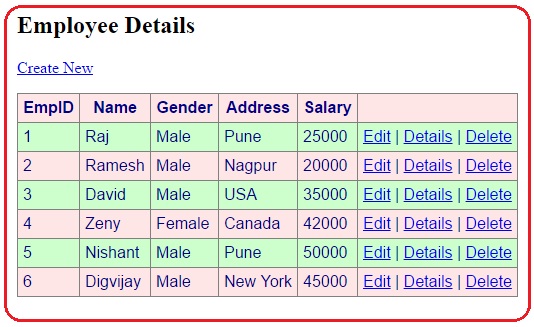
Now run the application and you will get output like this:
Run the application and navigate to http://localhost:57075/Employee/Index. The output should be as shown below. The port no may be different on your machine.
If you click on “create new” link or want to update the record then it will give you the error that resources are not found. In the next section we will see how to update the employee record.