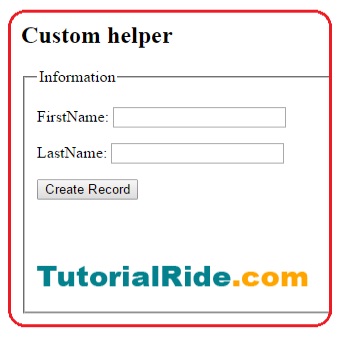
The ASP.NET MVC framework comes with number of inbuilt HTML helpers. But you can create custom HTML helpers according to your need.
You can create a new HTML helper by creating an extension method on the HtmlHelper class.
Let’s do an example, and understand how to create custom helper in ASP.NET MVC.
Create a new MVC application and give a name like MvcCustomHelper (You can provide any name). Now create a folder in the application. We have created CustomHtmlHelper folder. In that folder create a class and write an extension method.
using System.Web;
using System.Web.Mvc;
namespace MvcCustomHelper.CustomHtmlHelper
{
public static class CustomHtmlHelper
{
public static MvcHtmlString CustomButton(this HtmlHelper helper, string buttonText)
{
string str = "<input type=\"submit\" value=\"" + buttonText + "\" />";
return new MvcHtmlString(str);
}
public static MvcHtmlString Image(this HtmlHelper helper, string src,string alt)
{
TagBuilder tb = new TagBuilder("img");
tb.Attributes.Add("src", VirtualPathUtility.ToAbsolute(src));
tb.Attributes.Add("alt",alt);
return new MvcHtmlString(tb.ToString(TagRenderMode.SelfClosing));
}
}
}
In the CustomHtmlHelper class We created two extension methods. First is CustomButton and second is Image. For creating extension methods, the class and function should be static. The first parameter of extension method should be ” this” of type where you want to inject the extension method.
There is no default Image HTML helper, so We created this tag. Src and alt are two important attribute of an image tag. So you have to add these two tag explicitly using TagBilder class.
The return type should be IHtmlString, because strings are excluded from html encoding.
TagBuilder class
The TagBuilder class is used to create HTML tags. By using this class HTML tags building is very easy.
Important methods of the TagBuilder class:
- AddCssClass()
- GenerateId()
- MergeAttribute()
- SetInnerText()
- ToString()
The TagBuilder class has four important properties:
- Attributes
- IdAttributeDotReplacement
- InnerHTML
- TagName
Now create a HomeController and generate the view as given below.
Index.cshtml@using MvcCustomHelper.CustomHtmlHelper;
@{
ViewBag.Title = "Index";
}
<h2> Custom helper </h2>
@using (Html.BeginForm())
{
<fieldset>
<legend>Information</legend>
<p>
<label for="FirstName">FirstName:</label>
@Html.TextBox("FirstName")
</p>
<p>
<label for="LastName">LastName:</label>
@Html.TextBox("LastName")
</p>
<p>
@Html.CustomButton("Create Record")
</p>
<br /><br />
<p>
@Html.Image("∼/Photo/logo.png", "MyLogo")
</p>
</fieldset>
}
Because We have created our extension methods in namespace
MvcCustomHelper.CustomHtmlHelper, therefore we have to use this namespace in our view as
@using MvcCustomHelper.CustomHtmlHelper;.
An alternate approach is to register this namespace for an entire application in the
system.web.pages.namespaces section of the web configuration (web.config) file.
Then there is no need to write
@using MvcCustomHelper.CustomHtmlHelper; on each and every page.

Let’s take one more example that will display the custom html helper textbox. The background color of textbox will be light green.
public static MvcHtmlString BlueTextBox(this HtmlHelper helper)
{
var tagBuilder = new TagBuilder("input");
tagBuilder.Attributes["style"] = "background-color:lightgreen";
tagBuilder.Attributes["type"] = "TextBox";
return new MvcHtmlString( tagBuilder.ToString());
}
As you know the HTML elements are different types such as radio button, checkbox, textbox, password, Button etc. You can specify the "type" attribute to represent the type of the control you want to create.
Suppose that you want to create radio button, then change the type attribute as
tagBuilder.Attributes["type"] = "radio";