So first we will write the code in EmployeeBusinessLayer class. Create a method name UpdateEmployee() as given below.
public void UpdateEmployee(Employee emp)
{
string conString = ConfigurationManager.ConnectionStrings["EmpContext"].ConnectionString;
int empID = emp.EmpID;
string empName = emp.Name;
string empgender = emp.Gender;
double empSalary = emp.Salary;
string empAddress = emp.Address;
string strUpdate = "update tblemp set name='" + empName + "',Gender='" + empgender + "', salary=" + empSalary + ",Address='" + empAddress + "' where EmpID="+empID;
using (SqlConnection con = new SqlConnection(conString))
{
SqlCommand cmd = new SqlCommand(strUpdate, con);
con.Open();
cmd.ExecuteNonQuery();
}
}
Now write code for edit in EmployeeController class as given below.
[HttpGet]
public ActionResult Edit(int id)
{
EmployeeBusinessLayer obj = new EmployeeBusinessLayer();
Employee emp = obj.employees.Single(x => x.EmpID == id);
return View(emp);
}
When you click on Edit link, the above method will be called. The respective employee ID will be passed as parameter in Edit action method and you will get the Edit form with filled employee data. This method only responds to HTTP get request when editing data.
[HttpPost]
public ActionResult Edit(Employee emp)
{
if(ModelState.IsValid)
{
EmployeeBusinessLayer obj = new EmployeeBusinessLayer();
obj.UpdateEmployee(emp);
return RedirectToAction("Index");
}
return View();
}
The above method is called when you click on save button. This method internally called UpdateEmployee() method that is located in EmployeeBusinessLayer class.
The next important point is add the "Edit" view. Perform the following steps.
Right click on the "Edit" controller action method, and select "Add view" from the context menu and set the following attribute.
View name = Edit
View engine = Razor
Select "Create a strongly-typed view" check box
Model class = "Employee(DataLayer)"
Scaffold template = "Edit"
And click the "Add" button. You will get the following Edit.cshtml file.
@model DataLayer.Employee
@{
ViewBag.Title = "Edit Employee";
}
<h2>Edit Employee</h2>
@using (Html.BeginForm())
{
@Html.AntiForgeryToken()
@Html.ValidationSummary(true)
<fieldset>
<legend>Employee</legend>
@Html.HiddenFor(model => model.EmpID)
<div class="editor-label">
@Html.LabelFor(model => model.Name)
</div>
<div class="editor-field">
@Html.EditorFor(model => model.Name)
@Html.ValidationMessageFor(model => model.Name)
</div>
<div class="editor-label">
@Html.LabelFor(model => model.Gender)
</div>
<div class="editor-field">
@Html.DropDownList("Gender", new List<SelectListItem>
{
new SelectListItem { Text = "Male", Value="Male" },
new SelectListItem { Text = "Female", Value="Female" }
}, "Select Gender")
@Html.ValidationMessageFor(model => model.Gender)
</div>
<div class="editor-label">
@Html.LabelFor(model => model.Address)
</div>
<div class="editor-field">
@Html.EditorFor(model => model.Address)
@Html.ValidationMessageFor(model => model.Address)
</div>
<div class="editor-label">
@Html.LabelFor(model => model.Salary)
</div>
<div class="editor-field">
@Html.EditorFor(model => model.Salary)
@Html.ValidationMessageFor(model => model.Salary)
</div>
<p>
<input type="submit" value="Save" />
</p>
</fieldset>
}
<div>
@Html.ActionLink("Back to List", "Index")
</div>
Please delete the given below script code which is located at the bottom of the page.
@section Scripts {
@Scripts.Render("∼/bundles/jqueryval")
}
Delete the record
Now we will understand how to delete the record.Create a method name UpdateEmployee() as given below in EmployeeBusinessLayer class.
public void DeleteEmployee(int id)
{
string conString = ConfigurationManager.ConnectionStrings["EmpContext"].ConnectionString;
string strDelete = "delete tblemp where EmpID=" + id;
using (SqlConnection con = new SqlConnection(conString))
{
SqlCommand cmd = new SqlCommand(strDelete, con);
con.Open();
cmd.ExecuteNonQuery();
}
}
Now write code for delete in EmployeeController class as given below. This method internally called DeleteEmployee() method that is located in EmployeeBusinessLayer class. If you forget to write attribute [HttpPost] for action method Delete(), then it by default it will consider as [HttpGet].
[HttpPost]
public ActionResult Delete(int id)
{
EmployeeBusinessLayer obj = new EmployeeBusinessLayer();
obj.DeleteEmployee(id);
return RedirectToAction("Index");
}
After applying [HttpPost] attribute to Delete method and, if we run the application and click on "Delete" link on the "Index" view, we get an error stating - "The resource cannot be found". Because of this change the "Delete" method will not respond to "GET" request.
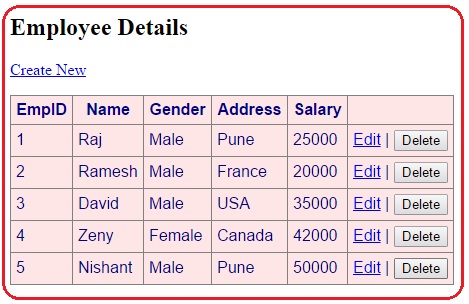
We have not created the view for Delete, so change the "Index.cshtml" as follows.
Replace the code below for each loop in Index.cshtml file as follows:
@foreach (var item in Model)
{
using (Html.BeginForm("Delete", "Employee", new { id = item.EmpID }))
{
<tr>
<td>
@Html.DisplayFor(modelItem => item.EmpID)
</td>
<td>
@Html.DisplayFor(modelItem => item.Name)
</td>
<td>
@Html.DisplayFor(modelItem => item.Gender)
</td>
<td>
@Html.DisplayFor(modelItem => item.Address)
</td>
<td>
@Html.DisplayFor(modelItem => item.Salary)
</td>
<td>
@Html.ActionLink("Edit", "Edit", new { id=item.EmpID}) |
<input type="submit" value="delete" />
</td>
</tr>
}
}
</table>
}
}
In the above HTML code, the important point is that, we have used "Html.BeginForm()" html helper to generate a form tag and also deleted the Details ActionLink. If you want the confirmation from user before deleting the employee record use JavaSript confirm dialog box. To include client-side confirmation add the "onclick" attribute to "Delete" button as shown given below.
<input type="submit" value="Delete" onclick="return confirm ('Are you sure to delete record with ID = @item.EmpID');" />
Execute your application you will get the above output. When you click on Delete button you will get the confirmation dialog box.
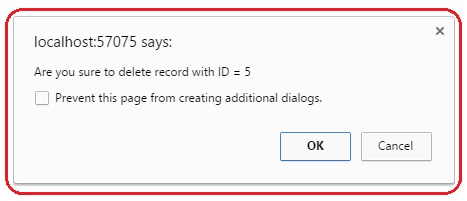
If you click on OK button the record will be deleted or you can cancel the operation.
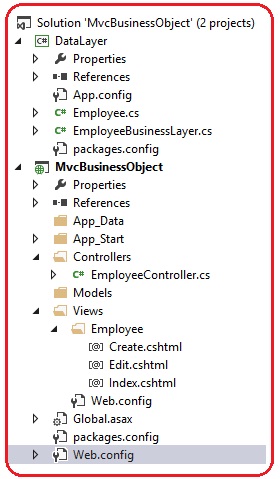
The overall folder structure of application will be as given below.