You can think of HTML helpers like old ASP.NET Web Form controls. HTML helpers are more lightweight than ASP.NET Web Form controls. It does not have an event model and a view state. You can also create your own helpers.
To create hyper link, use HTML.ActionLink() helper.
Example in Razor syntax:
@Html.ActionLink("Link Text", "Action Method name")
The first parameter is the link text, and the second parameter is the name of the controller action method.
This method does not link to a view but, you use the Html.ActionLink() helper to create a link to a controller action.You can also create custom helpers.
The Html.ActionLink() helper has several overloads that takes different parameters.
Some of the important parameters are as follows:
- linkText: The text for the link.
- actionName: The action method of controller that is the target of the link.
- routeValues: The set of values passed to the action.
- controllerName: The controller name that targets the link.
- htmlAttributes: The set of HTML attributes to add to the link.
- protocol: The protocol for the link.
- hostname: The hostname for the link.
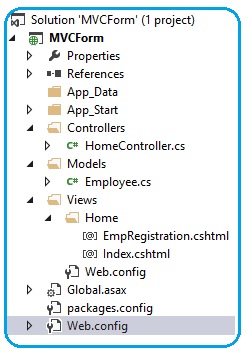
The folder structure of above program will be as given below:
Open the Visual Studio and select new project from the file menu. A dialog box appears; select "ASP.NET MVC4 Application" and click the Ok button.
A window is opened; in that select Empty icon from the template option and select Razor from the View engine drop down list and click ok.
Now add the Controller by right-clicking on the controller folder placed at the Solution Explorer by clicking add → Controller. A window will open; give the name of the controller as HomeController and add it.
using System.Web.Mvc;
namespace MVCForm.Controllers
{
public class HomeController : Controller
{
public ActionResult Index()
{
return View();
}
public ActionResult EmpRegistration()
{
return View();
}
}
}
When you add the controller, by default only Index() method is available. Add another action method named as EmpRegistration().
Add the Model by right-clicking on the Model folder in the Solution Explorer and add the class. Give the name of the class as Employee.cs
using System;
using System.Collections.Generic;
using System.Linq;
using System.Web;
namespace MVCForm.Models
{
public class Employee
{
public int EmpID { get; set; }
public string Name { get; set; }
public string Gender { get; set; }
public string Address { get; set; }
public double Salary { get; set; }
}
}
Now add two views. One for Index() and second for EmpRegistration(). You can add view by right-click on the ViewResult.
<!DOCTYPE html>
<html>
<head>
<title>Index</title>
</head>
<body>
<div>
<h3>Please fill the registration form </h3>
@Html.ActionLink("Registration", "EmpRegistration")
</div>
</body>
</html>
@model MVCForm.Models.Employee
<!DOCTYPE html>
<html>
<head>
<title>Employee Form</title>
<h2>Employee Registration</h2>
</head>
<body>
<style>
table, th, td
{
border: 1px solid grey;
border-collapse: collapse;
padding: 5px;
}
table tr:nth-child(odd)
{
background-color: #ffe6e6;
}
table tr:nth-child(even)
{
background-color: #ccffcc;
}
</style>
@using (Html.BeginForm())
{
<table style="font-family:Arial; font-size:medium; color:darkblue">
<tr>
<td><b>Employee ID</b></td>
<td >@Html.TextBoxFor(e => e.EmpID)</td>
</tr>
<tr>
<td><b>Employee Name</b></td>
<td>@Html.TextBoxFor(e => e.Name)</td>
</tr>
<tr>
<td><b>Gender</b></td>
<td>@Html.TextBoxFor(e => e.Gender)</td>
</tr>
<tr>
<td><b>Salary</b></td>
<td>@Html.TextBoxFor(e => e.Salary)</td>
</tr>
<tr>
<td><b>Address</b></td>
<td>@Html.TextBoxFor(e => e.Address)</td>
</tr>
</table>
<br /><br />
<input type="submit" value="Register" />
}
</body>
</html>
Execute the application; first you will see the registration page.
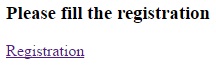
If user clicks on registration link, Employee registration page will be open.
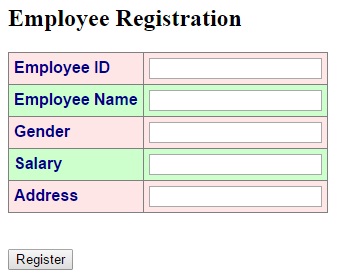
HTML Form Elements
In the above example we used only textbox, but HtmlHelper class provides a rich list of HTML helper that can be used to render HTML- BeginForm()
- EndForm()
- TextArea()
- TextBox()
- CheckBox()
- RadioButton()
- ListBox()
- DropDownList()
- Hidden()
- Password()