Layout view
A website may have some information or components that have common parts in the UI which remains the same throughout the application. As example logo, header section, footer section or left navigation bar. If you want to maintain a consistent look and feel across all the pages within your web application, then you have two options. First is that you have to design layout (logo, header section, footer section or left navigation bar) for each page. In this approach there is one biggest disadvantage. Normally the logo of the website is same for all pages. Suppose that you to change the logo, then you to change this logo on every page of your website. You need to work on each page separately.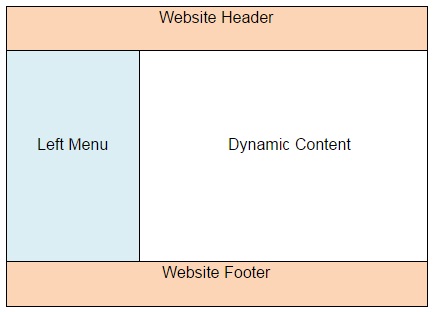
Sample Layout View
Layout in ASP.NET MVC is another option for creation the common Layout. Layout enables you to define a common site template. MVC Layout view contains common UI parts, so that we don't have to work on every page. After applying these UI templates you will get consistent look and feel across all the views/pages. The layout view concept is same as the master page of the ASP.NET webform application.
The layout view removes the identical task and increases development speed.
Let us do one example and understand how to create the Layout in ASP.NET MVC.
Creating an MVC Application with layout, follow the following steps.
- Go to "File" → "New" → "Project
- Choose "ASP.NET MVC 4 Web Application" from the list, and provide the application name "MvcLayoutDemo"
- Create a folder under the "View" folder and name it as "Shared" .
- Right-click on the Shared folder in Solution Explorer, then add "View". Give name of the view as _Layout. It will create “_Layout.cshtml" file under the "Shared" folder.
<!DOCTYPE html>
<html>
<head>
<meta name="viewport" content="width=device-width" />
<title>@ViewBag.Title</title>
<style>
table, th, td
{
border: 1px solid grey;
border-collapse: collapse;
padding: 5px;
}
table tr:nth-child(odd)
{
background-color: #ffe6e6;
}
table tr:nth-child(even)
{
background-color: #ccffcc;
}
</style>
</head>
<body style="font-family:Arial; font-size:medium; color:darkblue">
<div>
<table>
<tr>
<td colspan="2" style="text-align:center"><h3>Employee Detail</h3></td>
</tr>
<tr>
<td style="width:130px">@Html.ActionLink("Employee List","Index")</td>
<td style="width:500px">@RenderBody()</td>
</tr>
<tr>
<td colspan="2" style="text-align:center"><h3>Website Footer</h3></td>
</tr>
</table>
</div>
</body>
</html>
In the above code RenderBody() method plays an important role. It acts like a placeholder for other views. We have written RenderBody() method in second row and second column in the table. Therefore Index.cshtml file of the home folder will be injected and rendered in the layout view.
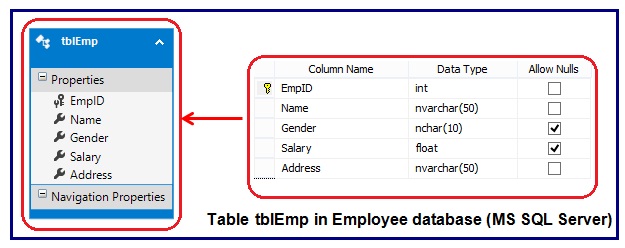
Creating the ADO.NET Entity Data Model
For creating Entity Framework, first you need to create an Entity Data Model. Follow these steps to generate an Entity Data Model from a database automatically.
- Right-click the Models folder in the Solution Explorer window and perform option Add→ New Item.
- Select the ADO.NET Entity Data Model template, give the Entity Data Model the name EmployeeDataModel
- Click the Add button, Data Model Wizard will open.
- Choose the Generate from a database option and click the Next button.
- Create your Data Connection, give the EmployeeDBContext as name of connection string in web.config file and click the Next button.
- In the Choose Your Database Objects step, select the tblEmp database table and click the Finish button
- Give the name of model namespace as “Models” and click finish.
Create Controller
Right-click on the Controllers folder under Solution Explorer, then go to "Add" and click on "Controller".
Controller Name: HomeController
Template: MVC controller with read/write actions and views, using entity framework.
Model Class: tblEmp (MvcLayoutDemo.Models)
Data Context Class: EmployeeDBContext(MvcLayoutDemo.Models)
using MvcLayoutDemo.Models;
using System.Data;
using System.Linq;
using System.Web.Mvc;
namespace MvcLayoutDemo.Controllers
{
public class HomeController : Controller
{
private EmployeeDBContext db = new EmployeeDBContext();
// GET: /Home/
public ActionResult Index()
{
return View(db.tblEmp.ToList());
}
// GET: /Home/Details/5
public ActionResult Details(int id = 0)
{
tblEmp tblemp = db.tblEmp.Find(id);
if (tblemp == null)
{
return HttpNotFound();
}
return View(tblemp);
}
// GET: /Home/Create
public ActionResult Create()
{
return View();
}
// POST: /Home/Create
[HttpPost]
[ValidateAntiForgeryToken]
public ActionResult Create(tblEmp tblemp)
{
if (ModelState.IsValid)
{
db.tblEmp.Add(tblemp);
db.SaveChanges();
return RedirectToAction("Index");
}
return View(tblemp);
}
// GET: /Home/Edit/5
public ActionResult Edit(int id = 0)
{
tblEmp tblemp = db.tblEmp.Find(id);
if (tblemp == null)
{
return HttpNotFound();
}
return View(tblemp);
}
// POST: /Home/Edit/5
[HttpPost]
[ValidateAntiForgeryToken]
public ActionResult Edit(tblEmp tblemp)
{
if (ModelState.IsValid)
{
db.Entry(tblemp).State = EntityState.Modified;
db.SaveChanges();
return RedirectToAction("Index");
}
return View(tblemp);
}
// GET: /Home/Delete/5
public ActionResult Delete(int id = 0)
{
tblEmp tblemp = db.tblEmp.Find(id);
if (tblemp == null)
{
return HttpNotFound();
}
return View(tblemp);
}
// POST: /Home/Delete/5
[HttpPost, ActionName("Delete")]
[ValidateAntiForgeryToken]
public ActionResult DeleteConfirmed(int id)
{
tblEmp tblemp = db.tblEmp.Find(id);
db.tblEmp.Remove(tblemp);
db.SaveChanges();
return RedirectToAction("Index");
}
protected override void Dispose(bool disposing)
{
db.Dispose();
base.Dispose(disposing);
}
}
}
In this chapter We are not writing the code for Edit, Delete, Details, and Index. These file will generate automatically for you.
Please note that you have to write the following code explicitly in each .cshtm file that is autogenrated.
@{
ViewBag.Title = "Employee Detail";
Layout = "∼/Views/Shared/_Layout.cshtml";
}
To associate a view with common layout file we have to set layout property on each and every view. It means we are writing same code (Redundant) in different places. We can get rid of this process.
Create a new view under the view folder and give name as _ ViewStart. It will create _ViewStart.cshtml file. Delete everything in this file and write the following code.
@{
Layout = "∼/Views/Shared/_Layout.cshtml";
}
Now there is no need to write this code on each and every view.
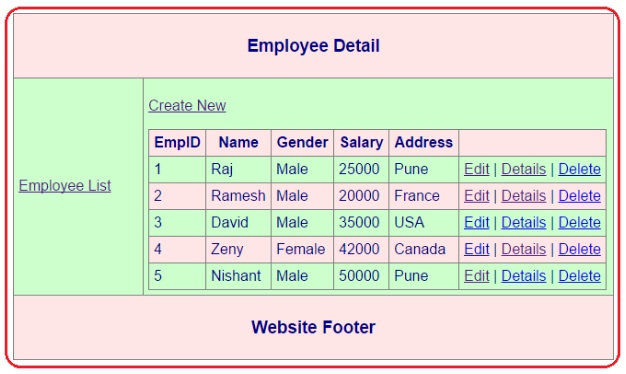
Now run your application you will get the following output.
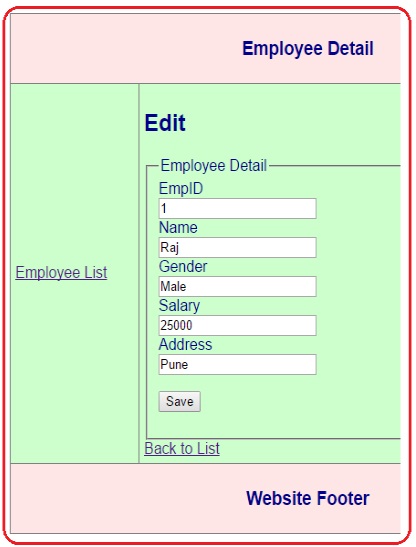
When you click on Edit link you will get the following output.
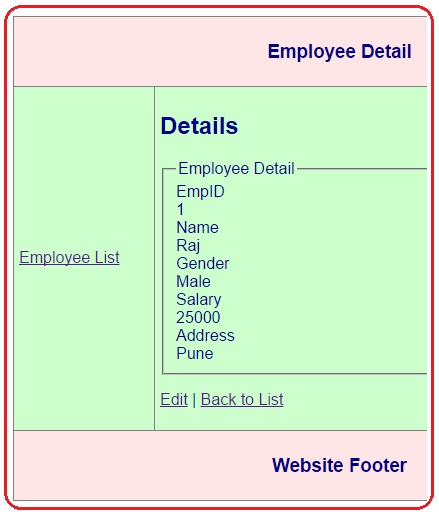
When you click on Details link you will get the following output.