CustomValidator control enables you to create your own validation and that validation can run with the other validation control on the page. The CustomValidator control performs validation, based upon your code, you write. You can write validation code that will be executed on the client side using JavaScript,or with server-side validation.
The CustomValidator control can work client-side, server-side, or both.
Custom validation on the client
Client-side validation provides immediate feedback, if error occurs.Steps for custom validation on the client
Step 1: Drag a Textbox and CustomValidator, set ControlToValidate and ErrorMessage properties of CustomValidator.Step 2: Create Javascript function.
function myCustomFunction(source, arguments)
The source parameter contains a reference to the validation control that is performing the validation. The second parameter (arguments) is an object that supports a property called Value; it represents the value of the form field, which is validated by your client-side function.
You can provide your function name according to application need.
Step 3: Use ClientValidationFunction property of CustomValidator and attach your javascript function.
Custom validation on the server
Drag the CustomValidator control on the web page. Set the ControlToValidate and ErrorMessage property. Double click on the CustomValidator control; you will get the event handler as:protected void CustomValidator1_ServerValidate(object source, ServerValidateEventArgs args )
{
}
Suppose that a user wants the input validation with following criteria.
- Password must be between 6-12 characters.
- Must have one capital letter.
- Must have one lowercase letter.
- Must have one numeric value.
Example
using System;
using System.Web.UI.WebControls;
public partial class CustomValidation : System.Web.UI.Page
{
protected void Page_Load(object sender, EventArgs e)
{
}
protected void CustomValidator1_ServerValidate(object source, ServerValidateEventArgs args )
{
string inputData = args.Value;
args.IsValid = false;
if (inputData.Length < 6 || inputData.Length > 12) return;
bool upperCase = false;
foreach (char ch in inputData)
{
if (ch >= 'A' && ch <= 'Z')
{
upperCase = true;
break;
}
}
if (!upperCase) return;
bool lowerCase = false;
foreach (char ch in inputData)
{
if (ch >= 'a' && ch <= 'z')
{
lowerCase = true; break;
}
}
if (!lowerCase) return;
bool number = false;
foreach (char ch in inputData)
{
if (ch >= '0' && ch <= '9')
{
number = true; break;
}
}
if (!number) return;
args.IsValid = true;
}
}
ASPX file
<%@ Page Language="C#" AutoEventWireup="true" CodeFile="CustomValidation.aspx.cs" Inherits="CustomValidation" %>
<!DOCTYPE html>
<html xmlns="http://www.w3.org/1999/xhtml">
<head runat="server">
<title></title>
</head>
<body>
<form id="form1" runat="server">
<div>
<asp:Label ID="Label1" runat="server" Text="Password"></asp:Label>
<asp:TextBox ID="txtPassword" runat="server" Width="143px" ToolTip="Password must be between 6-12 characters and include 1 capital letter, 1 lowercase letter, and 1 number"></asp:TextBox>
<asp:CustomValidator ID="CustomValidator1" runat="server" ControlToValidate="txtPassword"
ErrorMessage="Password must be between 6-12 characters and include 1 capital letter, 1 lowercase letter, and 1 number" OnServerValidate="CustomValidator1_ServerValidate"></asp:CustomValidator>
<br />
<br />
<br />
<asp:Button ID="Button1" runat="server" Text="Login" />
</div>
</form>
</body>
</html>
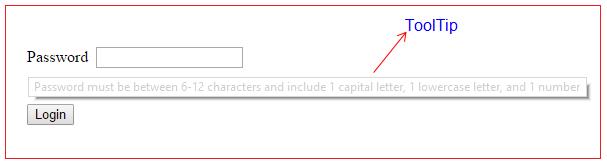
If you do not enter the data in the password field according to given criteria and press login button, then you will get the error.
When you roll the mouse cursor over textbox, then the ToolTip will popup.