Following are the important List Controls in ASP.NET.
- DropDownList
- RadioButtonList
- ListBox
- CheckBoxList
- BulletedList controls
Working with the DropDownList Control
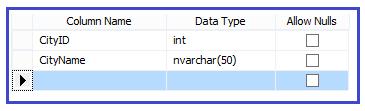
DropDownList control displays list of options. You can select only one item at a time from DropDownList. SelectedIndexChanged is the default event of DropDownList. By default AutoPostBack property is false for this control. If you want the value of selected item from DropDownList, then AutoPostBack property must be set as true. In case of AutoPostBack property true, whenever user selects the item from DropDownList, the form is automatically posted back to the server.Consider the following table structure. We will use this table in successive example. The table name is tblCity.
Example
using System;
using System.Data;
using System.Data.SqlClient;
using System.Configuration;
using System.Web.UI.WebControls;
using System.Web.UI;
public partial class ListControlsDemo : System.Web.UI.Page
{
SqlConnection conn;
SqlDataAdapter adapter;
DataSet ds;
SqlCommand cmd;
string cs = ConfigurationManager.ConnectionStrings["conString"].ConnectionString;
protected void Page_Load(object sender, EventArgs e)
{
if (!IsPostBack)
{
PopulateList();
}
}
protected void PopulateList()
{
try
{
conn = new SqlConnection(cs);
adapter = new SqlDataAdapter("select * from tblCity", conn);
ds = new DataSet();
adapter.Fill(ds);
DropDownList1.DataSource = ds;
DropDownList1.DataTextField = "CityName";
DropDownList1.DataBind();
}
catch (Exception ex)
{
Label1.Text = "ERROR :: " + ex.Message;
}
}
protected void DropDownList1_SelectedIndexChanged(object sender, EventArgs e)
{
string SelectedItem = DropDownList1.SelectedItem.Text;
Label1.Text = "Favourite City = "+SelectedItem;
}
}
Output:
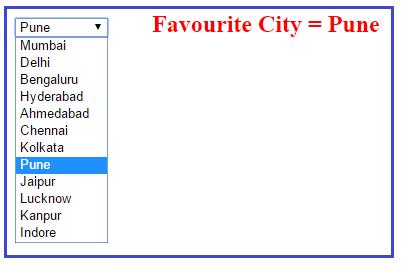
In the given example, PopulateList() is a user defined method to fill the DropDownList control. You can provide any name to populate the DropDownList control. When user selects the city name from DropDownList , SelectedIndexChanged event is fires and you will get the selected city name.
You can also use DataReader object to populate the DropDownList control as given below.
protected void PopulateList()
{
cmd = new SqlCommand("select * from tblCity", conn);
conn.Open();
SqlDataReader reader = cmd.ExecuteReader();
DropDownList1.DataSource = reader;
DropDownList1.DataTextField = "CityName";
DropDownList1.DataBind();
conn.Close();
}
The DropDownList control renders an HTML <select> tag.
Important properties of DropDownList
- Attributes: It provides the collection of attributes.
- DataTextField: This property is used to set the column value of database table.
- DataValueField: It provides the value of each list item.
- SelectedIndex: It provides the index of selected item.
- SelectedItem: Gets the selected item from list.
- SelectedValue: Provides the value of selected item from the list.
- Items: Provides the collection of items from list.
- Visible: It is a Boolean property that is used to determine whether the control is visible on UI or not.
Working with the RadioButtonList Control
User can select only one item from RadioButtonList Control. This control works same as DropDownList but the UI is totally different. The RadioButttonList control displays a list of radio buttons. It can be arranged either horizontally or vertically.protected void PopulateList()
{
try
{
conn = new SqlConnection(cs);
adapter = new SqlDataAdapter("select * from tblCity", conn);
ds = new DataSet();
adapter.Fill(ds);
RadioButtonList1.DataSource = ds;
RadioButtonList1.DataTextField = "CityName";
RadioButtonList1.DataBind();
}
catch (Exception ex)
{
Label1.Text = "ERROR :: " + ex.Message;
}
}
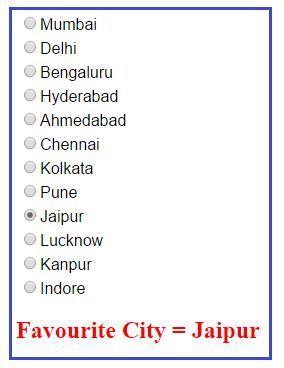
protected void RadioButtonList1_SelectedIndexChanged(object sender, EventArgs e)
{
string SelectedItem = RadioButtonList1.SelectedItem.Text;
Label2.Text = "Favourite City = " + SelectedItem;
}
For complete code please refer the previous code. SelectedIndexChanged is the default event of RadioButtonList. When you select any item from RadioButtonList, this event is fired. AutoPostBack property must be set as true otherwise you will not get the function of SelectedIndexChanged event. You can display any column value from database table as a list of item in the RadioButtonList control. For displaying the item in RadioButtonList control, set the value of DataTextField property. In the given example, We used "CityName" as the DataTextField property. You can provide any other column name as DataTextField property, according to need of application.
Working with the ListBox Control
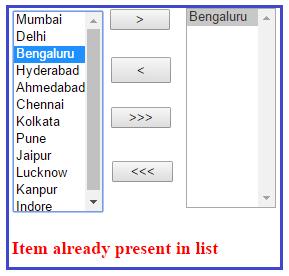
The ListBox control is similar to the DropDownList control but you can select more than one item from the list at a time. ListBox control has SelectionMode property that enables you to select multiple items from ListBox control. By default SelectionMode property is set as single. If you want to select multiple items from the ListBox, then set SelectionMode property value as Multiple and press Ctrl or Shift key when clicking more than one list item.Let us take one real world example. There are two ListBox control. One list box is populated with the city name that comes from the database table name tblCity. A user can select one or more item from the first ListBox and transfer into the second ListBox and vice-versa. User can also move the all item from ListBox one into another.
protected void PopulateList()
{
try
{
conn = new SqlConnection(cs);
adapter = new SqlDataAdapter("select * from tblCity", conn);
ds = new DataSet();
adapter.Fill(ds);
ListBox1.DataSource = ds;
ListBox1.DataTextField = "CityName";
ListBox1.DataBind();
}
catch (Exception ex)
{
Label1.Text = "ERROR :: " + ex.Message;
}
}
protected void Button1_Click(object sender, EventArgs e)
{
foreach (ListItem item in ListBox1.Items)
{
if (item.Selected)
{
if (ListBox2.Items.Contains(item))
{
Label1.Text = "Item already present in second list";
}
else
{
ListBox2.Items.Add(item);
}
}
}
}
protected void Button2_Click(object sender, EventArgs e)
{
foreach (ListItem item in ListBox2.Items)
{
if (item.Selected)
{
if (ListBox1.Items.Contains(item))
{
Label1.Text = "Item already present in first list";
}
else
{
ListBox1.Items.Add(item);
}
}
}
}
protected void Button3_Click(object sender, EventArgs e)
{
while (ListBox1.Items.Count > 0)
{
for (int i = 0; i < ListBox1.Items.Count; i++)
{
ListBox2.Items.Add(ListBox1.Items[i]);
ListBox1.Items.Remove(ListBox1.Items[i].Text);
}
}
}
protected void Button4_Click(object sender, EventArgs e)
{
while (ListBox2.Items.Count > 0)
{
for (int i = 0; i < ListBox2.Items.Count; i++)
{
ListBox1.Items.Add(ListBox2.Items[i]);
ListBox2.Items.Remove(ListBox2.Items[i].Text);
}
}
}
Output:
Working with the BulletedList Control
The BulletedList control enables you to display the list of items either a bulleted or ordered (numbered) list. By default BulletedList control displays the list of items in bulleted format. You can dispalys each list item as plain text, a LinkButton control, or a link to another web page. BulletedList control supports the BulletStyle property. You can use this property to change the style of Bullets. BulletStyle property supports the following styles.Circle, CustomImage, Disc, LowerAlpha, LowerRoman, NotSet, Numbered, Square, UpperAlpha, UpperRoman.
Example
protected void PopulateList()
{
try
{
conn = new SqlConnection(cs);
adapter = new SqlDataAdapter("select * from tblCity", conn);
ds = new DataSet();
adapter.Fill(ds);
BulletedList1.DataSource = ds;
BulletedList1.DataTextField = "CityName";
BulletedList1.DataBind();
}
catch (Exception ex)
{
Label1.Text = "ERROR :: " + ex.Message;
}
}
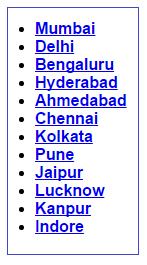
In this example the DisplayMode property is set as HyperLink.
You can also set BulletStyle to CustomImage and then assign an image path to the BulletImageUrl property.