Paging and sorting with GridView
If your application is working with huge amount of data, then it is not good and efficient to display all records at a time. Paging is a technique, which divides the records into pages. In DataGrid, the default page size is ten.The DataGrid supports two kinds of paging:
1. Default paging, and
2. Custom paging
In default paging, the entire records are fetched from the database, then the DataGrid selects records from entire set of data, according to page size, to display it in DataGrid.
In custom paging, developers have to write code for selective retrieve of the records from entire records to display in each page.
Custom paging provides better performance than default paging.
To enable default paging, set the AllowPaging property of the GridView to true.
Default value of PageSize property is 10. Set PageSize property to display the number of records per page according to need of your application.
The default event of DataGrid control is SelectedIndexChanged. The main event that is responsible for paging is PageIndexChanged event.
When the user clicks on paging link on the GridView, page is postback to the server. On postback, PageIndexChanged event of DataGrid is called. Set the PageIndex property of
DataGrid is as follows.
GridView1.PageIndex= e.NewPageIndex;
When user clicks on the paging link, new page index is set. GridView supports bidirectional paging.
To enable sorting, set the AllowSorting property of the GridView as true. It will create all column of GridView as clickable. The main event behind sorting in GridView is Sorting event. It fires when user click on the column link of GridView.
protected void GridView1_Sorting(object sender, GridViewSortEventArgs e)
{
}
GridViewSortEventArgs parameter supports SortDirection and SortExpression property.
SortDirection property is used to sort the grid column using ascending and descending order.
SortExpression property is the column name that you need to sort.
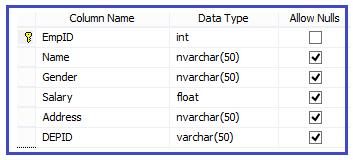
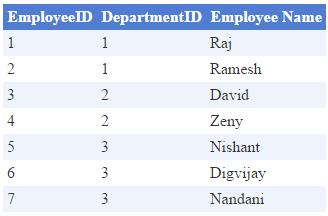
In this chapter, consider the following table structure for all examples.
Example
using System;
using System.Data;
using System.Data.SqlClient;
using System.Configuration;
using System.Web.UI.WebControls;
public partial class GridViewDemo : System.Web.UI.Page
{
SqlConnection conn;
SqlDataAdapter adapter;
DataSet ds;
string str="EmpID";
protected void Page_Load(object sender, EventArgs e)
{
if(!IsPostBack)
{
FillGridView(str);
}
}
protected void FillGridView(string str)
{
string cs = ConfigurationManager.ConnectionStrings["conString"].ConnectionString;
try
{
conn = new SqlConnection(cs);
adapter = new SqlDataAdapter("select * from tblEmps order by "+str, conn);
ds = new DataSet();
adapter.Fill(ds);
GridView1.DataSource = ds;
GridView1.DataBind();
}
catch (Exception ex)
{
Label1.Text = "ERROR :: " + ex.Message;
}
finally
{
ds.Dispose();
conn.Dispose();
}
}
protected void GridView1_Sorting(object sender, GridViewSortEventArgs e)
{
str = e.SortExpression;
FillGridView(str);
}
protected void GridView1_PageIndexChanging(object sender, GridViewPageEventArgs e)
{
GridView1.PageIndex= e.NewPageIndex;
FillGridView(str);
}
}
Execute the above code, you will get the output according to data in the database table. Default value of PageSize property is 10. We have set this value as 4. Therefore you will see the four records in GridView, at each page.
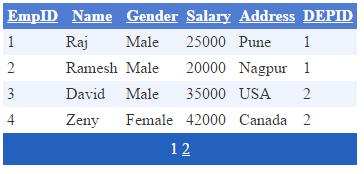
When you click on the next link, you will get the next records.
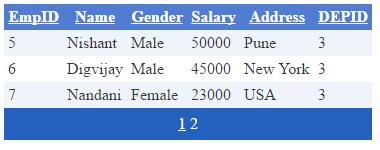
If you click on any column, record will be sort accordingly.
Displaying Empty Data
Suppose that there is no data in database table or no results are returned from the data source then you can display user friendly message in GridView that there is no record available.The GridView supports two properties that are used to display message when no results are returned. The two properties are:
- EmptyDataText
- EmptyDataTemplate
The GridView control supports the following types of fields:
- BoundField
- CheckBoxField
- CommandField
- ButtonField
- HyperLinkField
- ImageField
- TemplateField
Using BoundField
A BoundField property is used to display the value of a table column from database. BoundField provides the control over that how to display the column and its value. For Example, suppose that field name in the database table is EmpID but you want to show on webpage as EmployeeID, then simply assign the value in HeaderText as EmployeeID. You can also change the display order of column.As example that you want Department ID should come after EmployeeID then you can do it very easily by using the BoundField.
Important properties of the BoundField class of the DataGrid
- DataField: It bounds the column data of database table.
- DataFormatString: This property is used for string formats.
- HeaderText: It displays the custom header text on GridView.
- ReadOnly: It makes the field as non-editable.
- Visible: It is a Boolean property that enables you to make the column visible or hide according to value true or false.
- NullDisplayText: If there is no data in table, then you can use this property to display NULL message.
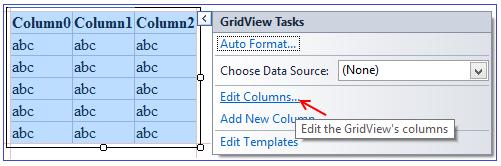
Click on Edit column link and provide text on HeaderText and DataField. Uncheck the Auto-generate fields’ checkbox.
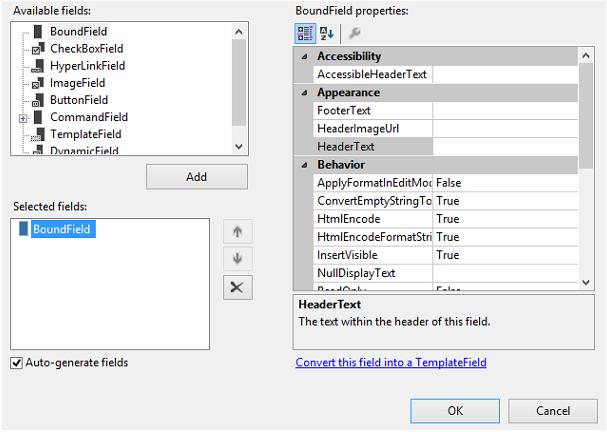
GridView control supports an AutoGenerateColumns property and by default its value is true. You have to make this property false explicitly. If you don’t disable AutoGenerateColumns property, then both columns will be displayed by the BoundFields
You can also bound the column in the aspx page as follows:
<Columns>
<asp:BoundField DataField="EmpID" HeaderText="EmployeeID" />
<asp:BoundField DataField="DepID" HeaderText="DepartmentID" />
<asp:BoundField DataField="Name" HeaderText="Employee Name" />
</Columns>
Populate the GridView as we have done in previous example and use BoundField.
The value of AutoGenerateColumns property must be set as false.
protected void FillGridView()
{
cs = ConfigurationManager.ConnectionStrings["conString"].ConnectionString;
try
{
conn = new SqlConnection(cs);
adapter = new SqlDataAdapter("select * from tblEmps", conn);
ds = new DataSet();
adapter.Fill(ds);
GridView1.DataSource = ds;
GridView1.DataBind();
}
catch (Exception ex)
{
Label1.Text = "ERROR :: " + ex.Message;
}
}
In the above code, in SQl query all records are selected but we have bound only three records and the column order is also change in output.
Using CommandFields
CommandField is used to perform Edit, Delete, Update, Cancel, and Select operations in easy way. There is no need to enable AutoGenerateEditButton or AutoGenerateDeleteButton properties in GridView when using a CommandField. CommandField supports the ButtonType property that is used to specify the type of button displayed by the CommandField. You can set as Button, Image, or Link. By default it is set as Link.Edit button is used to edit a record from data source. If user clicks on Edit button, then the edit button is replaced with an Update button and a Cancel button.
Delete button is used to delete a record from the data source.
<Columns>
<asp:CommandField ShowEditButton="True" />
<asp:CommandField ShowDeleteButton="True" />
</Columns>
Example:
using System;
using System.Data;
using System.Data.SqlClient;
using System.Configuration;
using System.Web.UI.WebControls;
public partial class GridViewDemo : System.Web.UI.Page
{
SqlConnection conn;
SqlDataAdapter adapter;
DataSet ds;
SqlCommand cmd;
string cs;
protected void Page_Load(object sender, EventArgs e)
{
if(!IsPostBack)
{
FillGridView();
}
}
protected void FillGridView()
{
cs = ConfigurationManager.ConnectionStrings["conString"].ConnectionString;
try
{
conn = new SqlConnection(cs);
adapter = new SqlDataAdapter("select * from tblEmps", conn);
ds = new DataSet();
adapter.Fill(ds);
GridView1.DataSource = ds;
GridView1.DataBind();
}
catch (Exception ex)
{
Label1.Text = "ERROR :: " + ex.Message;
}
finally
{
ds.Dispose();
conn.Dispose();
}
}
protected void GridView1_RowEditing(object sender, GridViewEditEventArgs e)
{
GridView1.EditIndex = e.NewEditIndex;
FillGridView();
}
protected void GridView1_RowUpdating(object sender, GridViewUpdateEventArgs e)
{
int userid = Convert.ToInt32(GridView1.DataKeys[e.RowIndex].Value.ToString());
GridViewRow row = (GridViewRow)GridView1.Rows[e.RowIndex];
TextBox txtName = (TextBox)row.Cells[2].Controls[0];
TextBox txtGender = (TextBox)row.Cells[3].Controls[0];
TextBox txtSalary = (TextBox)row.Cells[4].Controls[0];
TextBox txtAddress = (TextBox)row.Cells[5].Controls[0];
TextBox txtDepartmentID = (TextBox)row.Cells[6].Controls[0];
string updateQuery = "update tblEmps set name='" + txtName.Text + "',gender='" + txtGender.Text + "',Salary=" + txtSalary.Text + ",Address='" + txtAddress.Text + "',DepID=" + txtDepartmentID.Text + " where EmpID=" + userid;
cs = ConfigurationManager.ConnectionStrings["conString"].ConnectionString;
conn = new SqlConnection(cs);
cmd = new SqlCommand(updateQuery,conn);
conn.Open();
cmd.ExecuteNonQuery();
conn.Close();
GridView1.EditIndex = -1;
FillGridView();
}
protected void GridView1_RowCancelingEdit(object sender, GridViewCancelEditEventArgs e)
{
GridView1.EditIndex = -1;
FillGridView();
}
protected void GridView1_RowDeleting(object sender, GridViewDeleteEventArgs e)
{
int userid = Convert.ToInt32(GridView1.DataKeys[e.RowIndex].Value.ToString());
string deleteQuery = "delete from tblEmps where empID="+userid;
cs = ConfigurationManager.ConnectionStrings["conString"].ConnectionString;
conn = new SqlConnection(cs);
cmd = new SqlCommand(deleteQuery, conn);
conn.Open();
cmd.ExecuteNonQuery();
conn.Close();
GridView1.EditIndex = -1;
FillGridView();
}
}
Output:
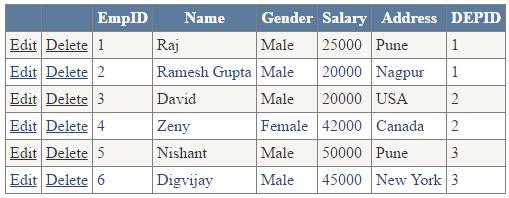
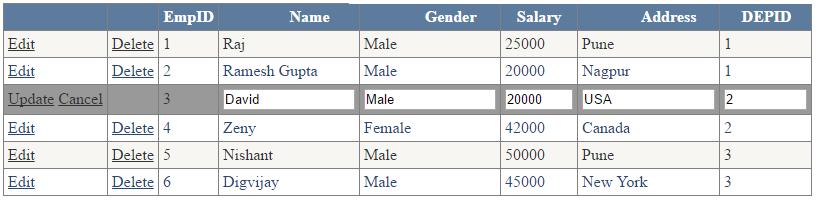
When user click on Edit link, then edit link is replaced by Update and Cancel Link. In this example EmpID is used as DataKeys, that’s why it is non-editable. You can provide DataKeys property of GridView form property window of GridView control.
Using TemplateField in GridView
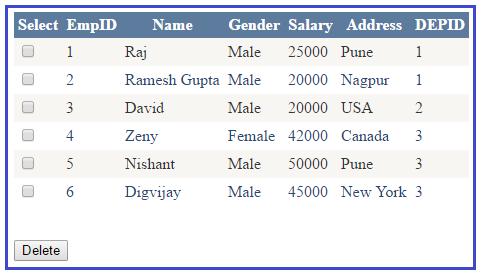
Using TemplateField, you can add HTML, DataBinding expressions, or ASP.NET controls in GridView. You can customize the user interface and add validation logic to the fields.Let us take an example in which user can select one or more checkbox to delete the record.
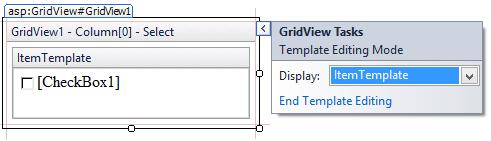
For doing this first we will add TemplateField in the GridView. Click on smart tag of GridView and again click on Edit Column. Select the TemplateField from available field and click on Add button. Provide the header text according to application need or left it blank and click OK. Now again click on Edit Templates link and add the checkbox at ItemTemplate and click End Template Editing. Here ID of the checkbox is CheckBox1.
You can also write the code an ASPX page as
<Columns>
<asp:TemplateField HeaderText="Select">
<ItemTemplate>
<asp:CheckBox ID="CheckBox1" runat="server" />
<br />
</ItemTemplate>
</asp:TemplateField>
</Columns>
TemplateField in GridView supports the following six types of templates:
- AlternatingItemTemplate: This template is used to display the content at every alternate row.
- EditItemTemplate: It is used when the user edit the records.
- FooterTemplate: As it name suggests that the contents of this template are displayed at the column footer.
- HeaderTemplate: It displayed the contents at the column header.
- InsertItemTemplate: When user inserted a new data item, then the contents of this template are displayed
- ItemTemplate: This template is used for every when rendered by the GridView.
protected void btnDelete_Click(object sender, EventArgs e)
{
foreach (GridViewRow gridrow in GridView1.Rows)
{
CheckBox chkDelete = (CheckBox)gridrow.FindControl("CheckBox1");
if (chkDelete.Checked)
{
int empid = Convert.ToInt32(gridrow.Cells[1].Text);
DeleteRecord(empid);
}
}
FillGridView();
}
protected void DeleteRecord(int ID)
{
string deleteQuery = "delete from tblEmps where EmpID="+ID;
cs = ConfigurationManager.ConnectionStrings["conString"].ConnectionString;
conn = new SqlConnection(cs);
cmd = new SqlCommand(deleteQuery,conn);
conn.Open();
cmd.ExecuteNonQuery();
conn.Close();
}
Output:
Using RowDataBound Event
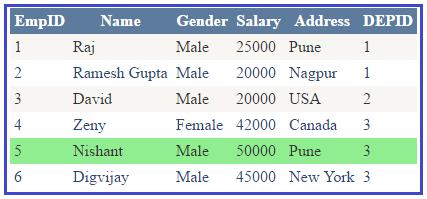
RowDataBound event fires when data row is bound to GridView. RowDataBound event is used when you want modify the appearance of individual rows in a GridView.Let us take an example that will highlight a particular row. Suppose that in an application a requirement is like, "If the salary of any employee is 50000 or more, then those particular rows should be highlighted with Light Green color".
Double salaryTotal = 0;
protected void GridView1_RowDataBound(object sender, GridViewRowEventArgs e)
{
if (e.Row.RowType == DataControlRowType.DataRow)
{
Double sal = (Double)DataBinder.Eval(e.Row.DataItem, "Salary");
salaryTotal += sal;
if (sal >= 50000)
e.Row.BackColor = System.Drawing.Color.LightGreen;
}
}
The second parameter of RowDataBound event provides lots of important properties.
protected void GridView1_RowDataBound(object sender, GridViewRowEventArgs e)
{
}
Some of the useful properties are as follows:
- Cells: It provides the cell collection of table row which is being bound.
- DataItem: It represents the data item which is going to bind with row.
- RowIndex: It provides the index of the bound row.
- RowState: It supports the following values. Alternate, Normal, Selected, and Edit.
- RowType: It provides the information about the type of row that is going to bound. It supports the following values.
DataRow, Footer, Header, NullRow, Pager, and Separator.