You can send the object to a remote application, using a Web Service.
Types related to Serialization and Deserialization is available in System.Runtime.Serialization.Formatters.Binary; namespace.
Binary serialization
Steps for serializing an object are as follows:1. Create a stream object.
2. Create a BinaryFormatter Object.
3. Call the BinaryFormatter.Serialize() method.
Steps for deserializing an object are as follows:
1. Create a stream object to read the serialized output.
2. Create a BinaryFormatter object.
3. Call the BinaryFormatter.Deserialize() method to deserialize the object, and cast it to the correct type.
Example
using System;
using System.IO;
using System.Runtime.Serialization.Formatters.Binary;
namespace ConsoleApplication1
{
class Program
{
public static void SerializeData()
{
string str = "Welcome at TutorialRide.";
// Create file to save the data.
FileStream fs = new FileStream(@"D:\MyDataFile.txt", FileMode.Create);
// BinaryFormatter object will perform the serialization
BinaryFormatter bf = new BinaryFormatter();
// Serialize() method serializes the data to the file
bf.Serialize(fs, str);
// Close the file
fs.Close();
}
public static void DeSerializeData()
{
// Open file to read the data
FileStream fs = new FileStream(@"D:\MyDataFile.txt", FileMode.Open);
// BinaryFormatter object performs the deserialization
BinaryFormatter bf = new BinaryFormatter();
// Create the object to store the deserialized data
string data = "";
data = (string)bf.Deserialize(fs);
//// Close the file
fs.Close();
// Display the deserialized strings
Console.WriteLine("Your deserialize data is ");
Console.WriteLine(data);
}
static void Main(string[] args)
{
SerializeData();
DeSerializeData();
Console.ReadLine();
}
}
}
Run the application and open the MyDataFile.txt file, you will see the contents of the string you stored along with by binary information which seems as garbage in Notepad.
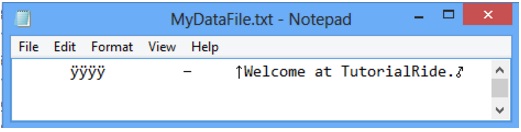
The string information stored as ASCII text and combined with binary bytes before and after the text to describe the data for the deserialization.
The above example is simply stores the string object as serialized data but you can serialize is more complex information such as the current date and time, custom class.
Serialization of custom classes
You can serialize and de-serialize custom classes by adding the Serializable attribute to the class. We will create a class and apply Serializable attribute with this class. When your class is serialized, the framework will serializes all members, including private members. If you want that particular member should not serialized during serialization process, then you can use [NonSerialized] attribute as given below.[NonSerialized] public float total;
Example
using System;
using System.IO;
using System.Runtime.Serialization.Formatters.Binary;
namespace ConsoleApplication1
{
[Serializable]
class Employee
{
public int EmpID;
public string EmpName;
public string Address;
public Employee(int id,string name, string EmpAdd)
{
EmpID = id;
EmpName = name;
Address = EmpAdd;
}
}
class Program
{
public static void SerializeData()
{
Employee obj = new Employee(1,"Raj","Pune");
// Create file to save the data.
FileStream fs = new FileStream(@"D:\Employee.txt", FileMode.Create);
// BinaryFormatter object will perform the serialization
BinaryFormatter bf = new BinaryFormatter();
// Serialize() method serializes the data to the file
bf.Serialize(fs, obj);
// Close the file
fs.Close();
}
public static void DeSerializeData()
{
Employee emp;
// Open file to read the data
FileStream fs = new FileStream(@"D:\Employee.txt", FileMode.Open);
// BinaryFormatter object performs the deserialization
BinaryFormatter bf = new BinaryFormatter();
// Create the object to store the deserialized data
emp = (Employee)bf.Deserialize(fs);
int id = emp.EmpID;
string name = emp.EmpName;
string Empadd = emp.Address;
//// Close the file
fs.Close();
// Display the deserialized strings
Console.WriteLine("Your deserialize data is ");
Console.WriteLine("EmpID = "+id);
Console.WriteLine("Emp Name = " + name);
Console.WriteLine("Emp Address = " + Empadd);
}
static void Main(string[] args)
{
SerializeData();
DeSerializeData();
Console.ReadLine();
}
}
}
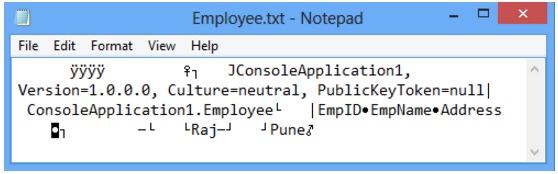
Run the above application and open the Employee.txt file, you will see something like as given below. The Employee class and its member are serialized and extra binary information is also appended with employee class member. When you de-serialized the previously stored information, you will get the original data.
XML serialization
XML serialization serializes an object into an XML document.System.Xml.Serialization namespace provides methods for converting objects into XML and write into XML files. XML serialization provides greater interoperability and better forward-compatibility.
Steps for serializing an object are as follows:
1. Create a stream.
2. Create an XmlSerializer object.
3. Use XmlSerializer.Serialize() method to serialize the object.
Steps for de-serializing an object are as follows:
1. Create a stream.
2. Create an XmlSerializer object.
3. Call the XmlSerializer.Deserialize() method to deserialize the object.
First we will serialize the DateTime object then custom class.
Example
using System;
using System.IO;
using System.Xml.Serialization;
namespace ConsoleApplication1
{
class Program
{
public static void SerializeData()
{
// Create file to save the data.
FileStream fs = new FileStream(@"D:\MyXMLFile.txt", FileMode.Create);
//XmlSerializer object will perform the serialization
XmlSerializer xmlObj = new XmlSerializer(typeof(DateTime));
// Serialize mehtod serialize the data to the file
xmlObj.Serialize(fs, System.DateTime.Now);
// Close the file
fs.Close();
}
public static void DeSerializeData()
{
// Open file to read the data
FileStream fs = new FileStream(@"D:\MyXMLFile.txt", FileMode.Open);
// XmlSerializer object to perform the deserialization
XmlSerializer xs = new XmlSerializer(typeof(DateTime));
// Use the XmlSerializer object to deserialize the data from the file
DateTime time = (DateTime)xs.Deserialize(fs);
// Close the file
fs.Close();
// Display the deserialized time
Console.WriteLine("Day: " + time.DayOfWeek + ", Time: " + time.TimeOfDay.ToString()+", Date: "+time.Date.ToShortDateString());
}
static void Main(string[] args)
{
SerializeData();
DeSerializeData();
Console.ReadLine();
}
}
}
XML serialization of custom class
To create a class that can be serialized by using XML serialization, you must keep in mind the following things:- XML serialization only serializes public fields and properties not private members.
- XML serialization does not include any type information.
- Class must be declared as public.
- Class should not contain parameterized constructor to serialize an object.
- ReadOnly properties are not serialized.
Example
using System;
using System.IO;
using System.Xml.Serialization;
namespace ConsoleApplication1
{
public class Employee
{
public int EmpID{get;set;}
public string EmpName { get; set; }
public string Address { get; set; }
public Employee()
{
EmpID = 0;
EmpName = "N/A";
Address = "N/A";
}
}
class Program
{
public static void SerializeData(Employee emp)
{
// Create file to save the data.
FileStream fs = new FileStream(@"D:\MyXMLFile.txt", FileMode.Create);
//XmlSerializer object will perform the serialization
XmlSerializer xmlObj = new XmlSerializer(typeof(Employee));
// Serialize mehtod serialize the data to the file
xmlObj.Serialize(fs, emp);
// Close the file
fs.Close();
}
public static void DeSerializeData()
{
// Open file to read the data
FileStream fs = new FileStream(@"D:\MyXMLFile.txt", FileMode.Open);
// XmlSerializer object to perform the deserialization
XmlSerializer xs = new XmlSerializer(typeof(Employee));
// Use the XmlSerializer object to deserialize the data from the file
Employee emp = (Employee)xs.Deserialize(fs);
// Close the file
fs.Close();
// Display the de-serialized data
Console.WriteLine("Employee ID = "+emp.EmpID);
Console.WriteLine("Employee Name = " + emp.EmpName);
Console.WriteLine("Employee Address = " + emp.Address);
}
static void Main(string[] args)
{
Employee empObj = new Employee();
Console.WriteLine("Enter employee ID");
empObj.EmpID = Convert.ToInt32(Console.ReadLine());
Console.WriteLine("Enter employee Name");
empObj.EmpName = Console.ReadLine();
Console.WriteLine("Enter employee address");
empObj.Address = Console.ReadLine();
SerializeData(empObj);
DeSerializeData();
Console.ReadLine();
}
}
}
The output after the serialization is:

In the above XML file, the Head tag of the XML created is same as the name of class and the subtag names are same as the properties in class Employee. Each public property is displayed in the form of Tags in the XML created on serialization. We can see in XML file that only public fields are displayed.
Attributes in XML Serialization
Some important attributes in XML Serialization are:- XmlAttribute: Containing member will be serialized as an XML attribute
- XmlElement: The field will be serialized as an XML element
- XmlIgnore: Field or property will be ignored during Serialization
- XmlRoot: it represent XML document's root Element
[XmlRoot("EmployeeDetail")]
public class Employee
{
public int EmpID{get;set;}
public string EmpName { get; set; }
[XmlAttribute("EmployeeType")]
public string EmpType { get; set; }
[XmlElement("EmpAddress")]
public string Address { get; set; }
[XmlIgnore]
public double Salary { get; set; }
public Employee()
{
EmpID = 0;
EmpName = "N/A";
Address = "N/A";
}
}
When you serialize the above code using XML serialization, as we have done before, you will see the XML serialized as follows.
<?xml version="1.0"?>
<EmployeeDetail EmployeeType="Permanent">
<EmpID>1</EmpID>
<EmpName>Raj</EmpName>
<EmpAddress>Pune</Address>
</EmployeeDetail>
XmlRoot:
Every XML has a root element. In XML serialization, the name of the root element is same as the name of the class. XmlRoot attribute is used to provide a custom name to the root element of XML. In the above code the name of the class is Employee and we have used [XmlRoot("EmployeeDetail")] before class declaration. Therefore root element is converted to EmployeeDetail in place of Employee.
XmlElement:
XmlElement is used for different Tag name in XML. We can use the XmlElement attribute to the class field or property. In the given code xml attribute [XmlElement("EmpAddress")] is used. So in XML file EmpAddress will be shown in place of Address.
XmlAttribute:
If we want that the property EmpType should displays as the attribute for the Tag EmployeeDetail, then we should use XmlAttribute. As example
EmployeeType="Permanent"
XmlIgnore:
All the fields and property should be public in XML serialization.
These fields or properties are persisted as an XML element or XML attribute in an XML-file. If you want that some fields should not be shown after XML serialization, then use
XmlIgnore attribute. It will remove the element from the XML as we have done in our example.
[XmlIgnore]
public double Salary { get; set; }
Serialization of DataSet
You can serialize a DataSet object to an XML file. The method for serialization of dataset is same as above but first you have to create dataset and populate with data. We will create a table using DataTable object and then add the table into the DataSet object. We have created the given below table named as Employee. You can create the table according to your need.| EmpID | EmpName | Address |
|---|---|---|
| 1 | Raj | Pune |
| 2 | Swaraj | USA |
Example
using System;
using System.Data;
using System.IO;
using System.Xml.Serialization;
namespace ConsoleApplication1
{
class Program
{
public static void SerializeData()
{
XmlSerializer xmlSerializer = new XmlSerializer(typeof(DataSet));
// Create a DataSet;
DataSet empDS = new DataSet("emp");
// Create DataTable.
DataTable empDT = new DataTable("Employee");
// Specify columns of a DataTable
empDT.Columns.Add("EmpID"); //Column1
empDT.Columns.Add("EmpName"); //Column2
empDT.Columns.Add("Address"); //Column3
// Add rows in DataTable
empDT.Rows.Add("1", "Raj", "Pune");
empDT.Rows.Add("2", "Swaraj", "USA");
// Add DataTable in DataSet
empDS.Tables.Add(empDT);
// Create an object of stream writer.
FileStream fs = new FileStream(@"D:\DataSetFile.xml", FileMode.Create);
// Serialize the instance of BasicSerialization
xmlSerializer.Serialize(fs, empDS);
// Close the stream writer
fs.Close();
}
static void Main(string[] args)
{
SerializeData();
Console.ReadLine();
}
}
}
Run the above application and open the DataSetFile.xml file, you will see the given below output. The XML schema shows all information about the dataset that you have created.
We have filled the dataset using hardcoded values but you can also use database to fill the dataset object.
On the other hand, you could use the DataSet.WriteXml, DataSet.ReadXML, and DataSet.GetXml methods for the same task.
<?xml version="1.0"?>
<DataSet>
<xs:schema id="emp" xmlns="" xmlns:xs="http://www.w3.org/2001/XMLSchema" xmlns:msdata="urn:schemas-microsoft-com:xml-msdata">
<xs:element name="emp" msdata:IsDataSet="true" msdata:UseCurrentLocale="true">
<xs:complexType>
<xs:choice minOccurs="0" maxOccurs="unbounded">
<xs:element name="Employee">
<xs:complexType>
<xs:sequence>
<xs:element name="EmpID" type="xs:string" minOccurs="0" />
<xs:element name="EmpName" type="xs:string" minOccurs="0" />
<xs:element name="Address" type="xs:string" minOccurs="0" />
</xs:sequence>
</xs:complexType>
</xs:element>
</xs:choice>
</xs:complexType>
</xs:element>
</xs:schema>
<diffgr:diffgram xmlns:msdata="urn:schemas-microsoft-com:xml-msdata" xmlns:diffgr="urn:schemas-microsoft-com:xml-diffgram-v1">
<emp>
<Employee diffgr:id="Employee1" msdata:rowOrder="0" diffgr:hasChanges="inserted">
<EmpID>1</EmpID>
<EmpName>Raj</EmpName>
<Address>Pune</Address>
</Employee>
<Employee diffgr:id="Employee2" msdata:rowOrder="1" diffgr:hasChanges="inserted">
<EmpID>2</EmpID>
<EmpName>Swaraj</EmpName>
<Address>USA</Address>
</Employee>
</emp>
</diffgr:diffgram>
</DataSet>